Audio - The Vital Component That Nobody Talks About
Stephen Robinson
Working Class Hunter
Audio is easily the most overlooked aspect of filming. We spend countless hours honing our video skill and practicing our craft. That time is well spent and has led to being much more creative and skilled behind the camera. Unfortunately, we tend to forget or even trivialize the importance of audio. We get so focused on the visual aspect of filming that audio tends to be relegated to the backseat or even the trunk at times. This is often a fatal mistake, as quality video is only as good as the audio that goes along with it. If the overall goal is to distribute your work via a profession platform such as Television or the Internet than you need to make sure quality audio takes as high a priority as the video you are laying down. We will discuss how to produce quality audio as well as the type of equipment necessary.
Internal Mic is Not Enough
First of all, as a general rule of thumb the internal microphone on your camera will not produce quality audio. It doesn’t matter if you are running a $300 Handicam or a $5000 professional camera. They just won’t cut the mustard as the saying goes. You are going to have to add a professional audio setup to your camera. Now, what type of audio setup depends on the type of camera you have, and I’ll cover several varieties.
Camcorder Audio
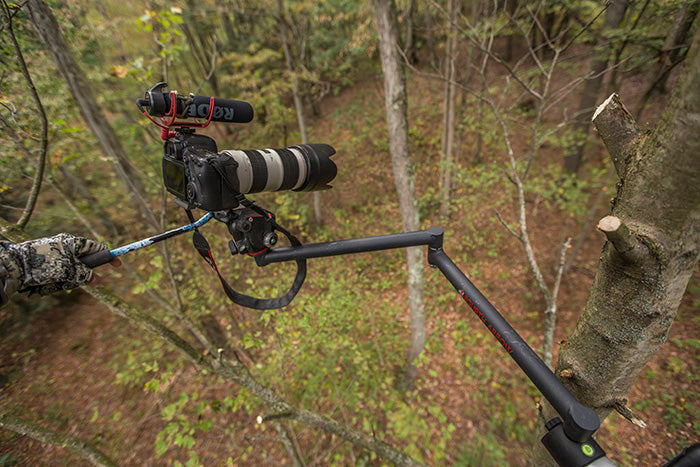
Most entry level videographers will start a consumer Handycam or some type of prosumer video camera. If you are using this style camcorder, it’s likely that your external audio options will be fairly limited. You will want to make sure that the camera has the capabilities of adding an external microphone via a 3.5mm stereo mini jack. Also, you will most likely need to mount the external microphone so it’s a good idea to purchase a camera that has a cold or hot shoe mount. The most common and probably the best external microphone for this type of setup would be the Rode VideoMic or VideoMic Pro. Something to keep in mind, and it is a drawback of this type of setup is that the cable on this type of microphone is not shielded and can experience radio frequency interference. That could be very problematic to your production value if it were to occur at the wrong time. Considering you will be doing most of your recording in the outdoors away from lots of electrical equipment you would expect to be safe from radio frequency interference, but you can’t forget about that wonderful cell phone that seems to always be readily accessible.
Let’s say you took the plunge and went for a professional camcorder. You payed a pretty penny for all the features in a professional camcorder, but you also get the benefits. One of the features that should be on all professional grade camcorders are XLR audio hookups. An XLR audio hookup provides several advantages. Firstly, the XLR on the camera can provide “Phantom” power to your microphone. This means it is possible to power the microphone via the camera battery instead of a second battery that is associated with the microphone. In addition to that benefit, you can purchase quality shielded XLR cables that will drastically cut down on the likelihood of having RF interference degrade your recorded audio. If you are running a camera with XLR inputs, then you will have a wide variety of options to record your audio. Typically these types of cameras will come with two XLR inputs. Sometimes you will only need to use one, but other times you can use both to record a wider range of audio. The first XLR input would usually be used for a shotgun microphone that is generally mounted directly onto the camera(assuming we are talking about filming your hunts). There’s a pretty wide variety of shotgun microphones on the market. Some of the more popular models are the Rode NTG1, NTG2, NTG3 or the Sennheiser MKE600, MKH416. These range in price from $250 all the way up to $1000 for the models listed. If you are looking for a budget friendly shotgun mic then check out the Audio-Technica AT875R. This a compact 7” shotgun mic that produces very good quality audio. I personally like the length so you don’t have any issues with the mic getting into the shot and at the price point, it’s really a bargain. This is the microphone that I have been using for the last 6 seasons and it has never let me down.
Shotgun Mics
Most shotgun mics pick up sound from the direction they are pointed. These Directional microphones do an excellent job of picking up sound, even at long distances, right out in front of where they are pointed, but do not pick up sound very well from the sides or behind the microphone. An omnidirectional microphone will do a better job of collecting sound from all directions. If you are using a directional shotgun microphone, it would be a good idea to add a wireless lavalier microphone so you can record quality audio of any interviews or of the hunter talking while the camera is filming something other than the hunter. Regardless of the shotgun mic that you choose, you will need to also have a quality shock mount to minimize any vibration or sound from the camera being transferred to the audio recording. Also, you will want to purchase a good quality windscreen to go over the shotgun microphone. Most shotgun mics come with a foam screen that will do a solid job indoors, but once outside you will pick up way too much wind noise. You just need to make sure that the screen you purchase fits your shotgun mic.
Lav Mics
There are lots of options for quality wireless lavalier microphones on the market and you can spend a pretty penny for a set. Some of the most popular models include the Sennheiser EW122PG3-B , Sony UWD-P11, Azden WLX-PRO, Polsen ULW-16. Lots and lots of options out there. One thing to know, especially on the cheaper wireless mics, they burn through batteries pretty quickly. Some models use 9-Volts, others use AA batteries and some are even rechargeable. It’s always a good idea to carry spare batteries and it’s doubly important to constantly monitor your audio. I have been running the Polsen ULW-16 for a about 3 years now. I feel like it does a nice job in the audio department, however there are some problems with them. It eats AA batteries like candy, so I run rechargeable batteries and always carry spare. Also, the audio channel buttons are on the face of both the transmitter and receiver and there’s no way to lock the channel. I have a tendency to bump the transmitter and change the channel I am on. That’s a problem because the receiver has to be set to the same audio channel or it not only doesn’t record the desired audio, it records random signal interference which makes that channel of audio completely unusable. Do your research before you commit to a wireless lavalier microphone so you don’t run into issues like this.
DSLR and Mirrorless Camera Audio
So let’s now talk about audio for DSLR’s and Mirrorless cameras. The internal microphone just won’t cut it, you will need to invest in some type of external microphone. As mentioned before, these type of cameras will only have a 3.5mm jack to ingest audio from an external source. This means a shotgun microphone like the Rode VideoMic or VideoMic Pro would be a solid choice. If you want to step up into the professional audio arena, you can do this by adding an XLR adapter like a JuicedLink or a Beachtek adapter. These adapters allow you to connect XLR audio inputs through the adapter which connects to the camera via the 3.5mm Audio input on the camera. The benefit of this type of setup is that you will now have full control of your audio volume levels for each channel and you have the capability of having both a shotgun microphone and a wireless lavalier to provide the best possible audio output.
Monitor Your Audio
Once you have selected all of the hardware, it’s crucial to practice and understand the capabilities and the limitations just as you do with your camera. It is also extremely important to monitor your audio. Every time you set up to film, you need to monitor the audio to make sure you are recording what you expect to be recording. This is done by using a set of headphones or at least a quality set up earbuds plugged directly into the camera or audio recording device. Don’t just rely on the audio meters on the camera, that will not guarantee you are recording the correct channels or that there isn’t something causing audio issues. It’s much better to find the problem ahead of time than it is to find out in post production that you don’t have quality audio to match the video. I can’t reiterate enough just how important quality audio is, don’t be the one that takes audio for granted and learns the hard way.